
Here we go to start:-
To add a new Guest Virtual Machine, Launch Hyper-V Manager from “Administrative Tools” and connect to the server with the Hyper-V Role
In the Actions Menu on the right, click “New“. Click Next on the “Before you begin” wizard introduction window.

In the Specify Name and Location window, Enter the name of the Guest Operating System. If you do not want to save the Virtual Machine in the default location then check the box for “Store the Virtual Machine in a different location” and browse and locate your new location. Once done, click Next.

In the Assign memory window, set the memory for the Guest OS and click Next. Default is 512MB.

In the Configure networking window, Select the Virtual Network (should have been created at the time of enabling the Hyper-V rols or can be done later on). If you choose the connect to the Virtual network later, select “Not connected” and click Next.

In the Connect Virtual Hard Disk window, create a new Virtual Hard disk and set its size. Here again, you can choose to save the disk in a different location than the defaults. Also, if you already have a Virtual Disk and want to use it (So in previous post we have copied a VDH, we can use that VHD here as well), you can do so or choose to attach a Virtual Hard Disk later. Once, Virtual Hard Disk (VHD) is created, click Next.

In the Installation Options window, choose the media to perform the installation. This could be your physica CD/DVD drive or an ISO image on the system or Floppy disk or even from a Network installation server. Choose the installation option and click Next.

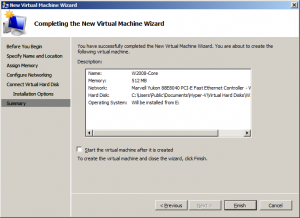
In the Summary window, check your options and click Finish if all is good to go. Here you can choose to Start the Virtual Machine immediately after it is created. Default is to keep the VM OFF.

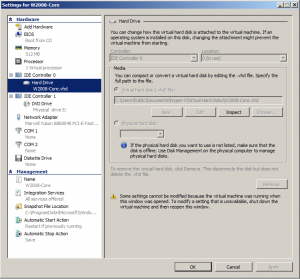
Now, you can see the new VM under the Virtual machines box in the Hyper-V Manager. When you click on it, in the bottom left, you can check the options specific to this virtual machine. The Settings option allows you to change any parameter like memory set at the time of creating the VM. One of the key thins to note is the “Integration Services” found under Management in the left pane. Integration services run under the guest operating system to provide some level of “integration” between the host and the guest OS like time sync, Guest OS backup etc.
Click Start under the VM or right-click and select Start to start the Virtual OS. This starts and runs in the background. Click Connect to actually, open a console session with the Guest OS.Depending on your Host system performance level you can run multiple Guest OSs at any given time.

No comments:
Post a Comment